
At my evening class we have been doing primroses. Here is how I've been taught to make them.  Equipment:
Flowerpaste
Food colouring (primrose)
Mexican Hat Board
Primrose Flower Cutter(Medium) Orchard Products
Artist's Palette Knife
Cocktail Stick
Wooden dowelling, sharpened at one end
Non stick Board
Rolling Pin
Yellow dusting Powder
Green Food Dye
Green Dusting Powder
26 wire
Edible glue
Glaze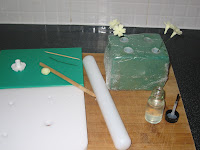 Step 1. Dye flowerpaste to a pale yellow, with primrose food colouring
Step 2. Take a small amount of flowerpaste and roll into a cone. (Roll into a ball, then just roll and put pressure on one side to create cone)
Step 3. Put in 3rd smallest hole in Mexican Hat Mat and push in with thumb.
Step 4. Roll flowerpaste flat with either rolling pin or wooden dowelling. Make sure it is thin.
Step 5. Take flowerpaste out. Place "tail" into cutter first, down into the tube part.
Step 6. Turn cutter upside down, and place on cutting board. Cut out.
Step 7. If flowerpaste still in cutter, more than likely, then push through carefully with cocktail stick. OR like my friend Gayle, blow it out!
Step 9. With a cocktail stick, gently run over each petal, from centre to the outside, to thin the petal.
Step 10. With a 7cm piece of 26 gage wire, turn a few mm over and push the ends together. Dip into the edible glue.
Step 11. Push the wire through the flower, the hook bit at the top. Stop when just under the hole you've made with the dowel. Gently press flowerpaste so it sticks to wire. Bend flower petals as you wish to place them. Let dry.

Step 11. Once dry you can dust the flowers. Add a tiny dot of green to centre of flower, into the hole. Then dust a small circle of a darker yellow around the green dot you've just made.
Step 12. Make leaves. Colour flowerpaste to a leaf green colour.
Step 13. Roll out thinly. Use a primrose leaf cutter or oak leaf cutter (as I did)
Step 14. Lay on leaf veiner (I'm using a rose leaf veiner)
Step 15. Twizzle a small amount of flowerpaste onto 26 gage wire, roughly the length of the leaf. Lay wire on top of leaf (see below)

Step 16. Press veiner together. You now have a leaf!
Step 17. Dust with green dust and dip in glaze when dry.
Step 18. Assemble into a display, as you desire.
 If there's anything that doesn't make sense, or you liked this, please let me know!


4 comments:
They are beautiful - I thought it was a photograph of some real primroses that you were using as inspiration!
That is the kindest thing I thnk I've heard in a long while! That's very sweet of you. I really enjoy my classes, I have a great teacher!
Dear Claire
It was nice stopping by your blog. The primroses have come out nicely and i liked your step-by-step demonstration on how to make it. You have a good visual appeal !
Dear Claire,
thank you for this tutorial! I know how much work it is!
On my German website, I created a collection of links to sugar flower tutorials. This collection also includes a link to your primrose tutorial
Now I added to the links tiny little pictures of the finished flowers (57X57 px), which are also linked.
Would that be all right for you? If not, please contact me and I will remove the picture immediately!
Here you can have a look at my website:
http://floralilie.jimdo.com/links/zucker-kunst/
All the best
Tina
Post a Comment